DIY Thread Spooler

I tie my flies, teasers, tails, flags, and bucktail jigs because I like to fish with custom color patterns that mimic baitfish and attract predatory fish. For saltwater species, a strong common thread works well. I recently inherited a collection of large thread spools. Hence, I built a simple thread spooler to fill my empty spools with thread for tying.

Fish360 DIY Thread Spooler

Making a thread spooler is simple. First, insert a bolt (e.g. 8-32 x 3″) with a flat washer through the small spool and then secure the bolt to the spool using a flat washer and nut. Second, insert the exposed end of the bolt into a hand-held drill and tighten the chuck. Third, secure the end of the thread onto the middle of the empty spool via a piece of tape. Lastly, press the trigger of the drill with one hand while holding the thread and applying pressure with your other hand as you guide the line so that the line wraps evenly onto the spool.

Facebooktwitterlinkedin

DIY Canal Cruiser Crate

My first canal cruiser had a plastic milk crate and PVC rod holders. This system worked well— until the milk crate started to crack. For my new canal cruiser, I decided to build a custom canal cruiser crate that would provide more storage, support my fishing rods and reels, and not fail due to fatigue.

DIY Canal Cruiser Crate

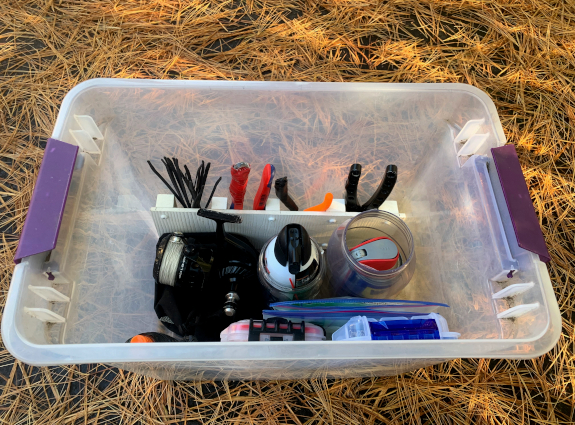
My custom canal cruiser crate has three components: the box, the clamps, and the rod holders. I made the box from 1/4″ thick plywood and the stitch-and-glue method, which uses epoxy fillets and fiberglass tape. After the crate was built, I sanded the interior and exterior with 120-grit sandpaper and then applied multiple layers of spray paint, with light sanding via 220-grit sandpaper between each layer. Three spray cans later, the box was ready to be mounted to the rear rack of my eBike via clamps.

DIY Canal Cruiser Crate

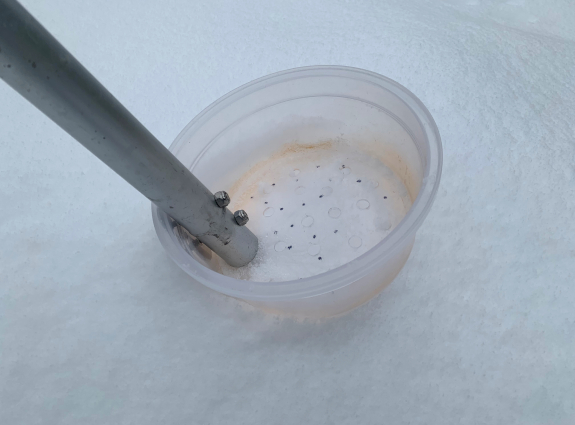
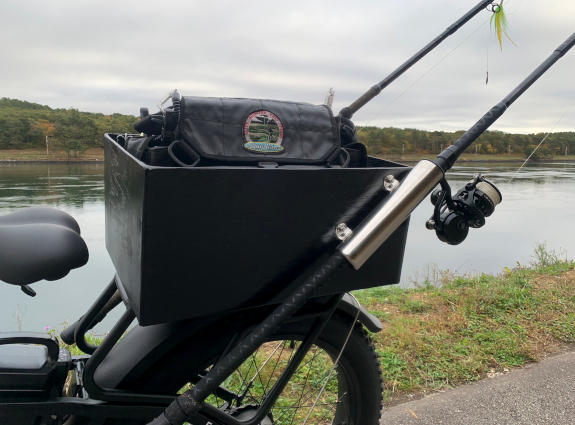
With the box secured, I cut a foam pad to fit the bottom interior of the crate. The foam pad covers the stainless steel bolts that secure the crate to the clamps and thereby prevents the bolt heads from snagging my gear. The pad also protects my gear from impact while riding over rough terrain. Lastly, the pad reduces sounds, which is helpful when approaching a sensitive spot below the dark of night.

The most common fishing rod holder for fishing bikes is a PVC pipe and hose clamps. Installed properly, this method works well. However, I chose stainless steel rod holders mounted to the sides of my crate via stainless steel bolts because they are a low-cost insurance policy for my expensive fishing rods and reels.

DIY Canal Cruiser Crate

My custom canal cruiser crate performed exceptionally well during my field testing. My expectations were exceeded! I love the simplicity, durability, low cost, and utility. I am paper prototyping some add-ons. Subscribe to my newsletter to receive the future article.

Amazon Affiliate Links

Facebooktwitterlinkedin

DIY Ice Fishing Skimmer

On my first ice fishing trip, I was dressed for the weather, I had an ice fishing sled, two tip-ups, and no ice skimmer. Thankfully an ice angler on the lake was more than willing to let me borrow his. If you are new to ice fishing, do not get overwhelmed by the all the gear and the cost. Make your own ice skimmer!

Fish360 DIY Ice Skimmer

You can make an ice skimmer from recycled products and simple tools. For example, you just need a rod, a “scoop”, and two threaded bolts with washers and nuts. I made mine from a recycled pool pole a round plastic Tupperware container that I rescued from the recycle bin.

Fish360 DIY Ice Skimmer

First, drill a series of holes on the bottom of the scoop to allow the water to drain. Second, drill two holes through the shaft for the bolts. Thirdly, drill two holes through the side of the “scoop” and secure it to the shaft via bolts, washers, and nuts.

Fish360 DIY Ice Skimmer

I cut the shaft on my ice skimmer based on my height so that I do not need to bend over to clean my ice fishing holes. I also made a grip by using recycled rope and electrical tape.

Facebooktwitterlinkedin

DIY Fly Dryer

I tie my own teasers, tails, and flies. In order for my medium viscosity fly tying epoxy to harden evenly, I need to rotate my presentations as the epoxy cures. Hence, I made a rotary fly drier.

Fish360 DIY Fly Dryer

All you need for this simple rotary fly drying solution is a cordless power drill; a machine screw with two flat washers and a nut; an elastic; and some recycled styrofoam cut in the form of a circle. I like to use recycled styrofoam from food tray containers— I just double up the circles for more “holding power”.

Once you have the materials, mark the center of the styrofoam circle(s) and punch a hole through the mark to accommodate the threaded bolt. Insert a washer into the bolt. Insert the bolt with the washer through the styrofoam circle(s). Insert the second flat washer and thread on the nut until the washers are pressed against the styrofoam circle(s). Secure the fly dryer assembly to the drill’s chuck and wrap an elastic on the drill’s handle to apply a light pressure on the trigger, which keeps the drill rotating at a low speed.

This is a great option if you already have a cordless drill with “pedestal” base. You are simply expanding the applications of your already existing tool and increasing your ROI (return on investment).

Facebooktwitterlinkedin

DIY To-Go Fishing Box

As an all species, all methods angler, I fish year round. Each year, the demands on my time increases exponentially. Organization is not one of my natural strengths; it’s a skill that I have had to learn and master. Time is fish! Hence, I have developed systems to keep my fishing gear organized and ready to go fishing at a moment’s notice. For example, I have To-Go Fishing Boxes for specific species and methods.

Fish360 DIY Surfcasting To-Go Box

I make my custom To-Go Fishing Boxes out of re-purposed clear plastic totes. For example, my surfcasting To-Go Fishing Box I use empty plastic jars to store WD40 lubricant and a can of compressed air; this keeps them accessible at all time and from swimming inside the box at random as I drive to and from my spots. I made a custom storage sub-system for my Knipex mini-bolt cutters, pryers, pliers, and zip ties from repurposed PVC boards.

Making your own custom To-Go Fishing Box will increase your fishing time and ensure you have all the essential gear when you are on the bank or in your boat. Make yours today!

Facebooktwitterlinkedin

DIY Canal Cube

I enjoy fishing the Cape Cod Canal. Since I have a 90 minute commute, each way, when I make it down to fish the Cape Cod Canal, I maximize every minute I have. Given the varying depth, changing current, and complex structures, I cover the water column via wide range of plugs, metals, plastics, and jigs. I find that plug bags are not that helpful on the banks of the Cape Cod Canal. I have been experimenting with alternative plug storage and transport solutions that can accommodate a wide range of presentations from spooks to jigs and everything in between. Today I tested my latest solution, the Canal Cube.

Fish360 DIY Canal Cube

Making your own Canal Cube is easy. First, get a small square plastic bucket. Second, cut several 9″ lengths of PVC drain pipe to fill the cavity of your bucket. Thirdly, remove the bucket’s handle, widen the handle holes using a large enough drill bit to accommodate the diameter of your rope, and lastly secure a rope handle. Lastly, insert the 9″ long PVC drain pipe plug tubes into the bucket.

I am happy to share that my Canal Cube worked surprisingly well. I can carry a wide spectrum of presentations and quickly change up my presentation in seconds. In addition, my Canal Cube fits inside the milk create on my Canal Cruiser.

Facebooktwitterlinkedin

Frabill Bear Claw Kayak Fishing Net II

I purchased the Frabill Bear Claw Kayak Fishing Net one year ago. I have landed several fish using this net; several of which, I would have lost, including my new personal best 6 pound largemouth bass that I surfaced with a 3 pound wad of weed. I have made two modifications to my Frabill Bear Claw Kayak Fishing Net, which have enhanced my kayak fishing.

Fish360 Frabil Bear Claw Net Mods

First, I added a pool noodle to the aluminum rim of the net via zip-ties. This allow my net to float from the side of my kayak. I like to keep my net hanging on the side of my kayak because it’s closer to the fish and hence help me to land fish faster. This setup also acts as a drift soft, which is great when I am drifting and casting along a shore line in search of fish.

Fish360 Frabil Bear Claw Net Mods

Second, I tightened the two screws on the sides so that the net no longer folds. I like the folding feature for storage, but when I am kayak fishing, I want the net fully extended at all times. The less maneuvers I need to make while landing a fish, the less likely I will lose a fish. Time is fish. Thankfully, I have several storage solutions that optimizes the spaces in my workshop, shed, and garage. Storing a fully extended Frabill Bear Claw Kayak Fishing Net is not a problem.

Facebooktwitterlinkedin

DIY UV Booth

I recently shifted to Solarez UV Resin (medium viscosity), which together with my UltraFire UV Flashlight (with rechargeable Li batteries!) makes tying flies and jigs more efficient. Holding the UltraFire UV Flashlight for one fly or jig is fine; but not for several flies or jigs. Hence, I made a UV Booth from a recycled carboard box.

Fish360 DIY UV Booth

Making your own UV Booth is easy. First, make a 3-sided box such that your vice fits inside and you can rotate the hook or jig that you are tying. Second, place the UltraFire UV Flashlight on the center of the box’s top and trace the flashlight’s lens circumference onto the box via Sharpie. And lastly, cut out the hole via utility knife. The UltraFire UV Flashlight has a flange that holds and keeps the flashlight from falling through.

This simple and low-cost solution allows me to safely apply UV light onto the Solarez UV Resin so that the epoxy can cure while I am doing something else. Time is fish!


Facebooktwitterlinkedin

DIY Trout Nibbles Storage

I have had great success with Berkley’s PowerBait Trout Nibbles on multiple species. I use to secure the Berkley jar to my belt or kayak via lanyard. This method worked well until the cap of the Berkley jar came undone and my trout nibbles accelerated to Earth via gravity. I hence developed my own storage solution.

Fish360 DIY Trout Nibbles Storage

Making your Trout Nibbles Storage unit is simple. First, secure a length of 80 lb monofilament to the neck of an empty medicine container via improve clinch knot. Second, slide aluminum crimps down each tag end until they reach the neck of the container. Third, wrap the tag ends around each other to form a loop and secure them via aluminum crimps.

I like this simple storage for three reasons. First, the lid does not come undone; you have to push down on the lid to open. Second, the larger capacity; my Trout Nibble Storage solution can store three Berkely PowerBait jars. And lastly, it’s very inexpensive; pennies.

Facebooktwitterlinkedin

DIY Ice Fishing Propane Bottle Storage Solution

I have a Jiffy Propane auger and a Mr. Heater propane heater for ice fishing, which I rig with propane bottles prior to each trip. On each ice fishing trip, I carry a couple of extra propane bottles in my ice fishing sled. I have been lucky in that my propane bottle have never frozen or exploded on me. Preemptively, I built a simple portable propane storage solution that keeps my propane bottles warm and secure.

Fish360 DIY Ice Fishing Propane Storage

Making this simple storage solution is easy. I made mine in less than one hour.

Fish360 DIY Ice Fishing Propane Storage

First, I made a simple jig out of a recycled MDF sheet. I cut out a simple rectangle based on the inner dimensions of a recycled cooler. I used my Rigid sander to get it to the exact size so that it fits snug in the cooler. I then made two centered and equidistant 4 1/8″ holes using a whole saw bit and my DeWalt drill.

Second, I cut a series of 2″ thick foam insulation form panels using my template, a hacksaw blade, and a 4 1/8″ whole saw bit.  When drilling out the holes in the insulation foam, make sure the drill bit is spinning before it touches the insulation. Also be sure to wear a dust mask and eye protection. Insulation shavings go everywhere! And lastly, I stacked the foam panels into the cooler.

This inexpensive portable propane bottle storage solution works amazingly well. My propane bottle are protected from freezing and propane ping pong.

Facebooktwitterlinkedin