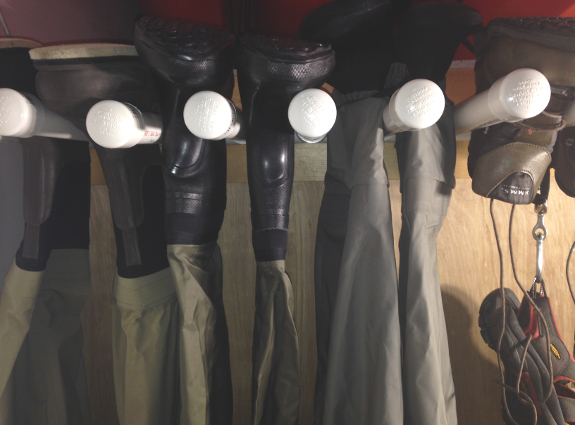
As I add more species and methods to my target list, my wader and water footwear collection grows. I searched for a commercial wader rack, but I could not find one that would maximize the available wall section in my garage. So, I built a wader rack to store my waders and boots.
Building your own wader rack is not difficult. You do not need a contractor’s licence! In fact, you just need some inexpensive materials and basic tools.
Materials
- 1 1/4″ PVC Pipe
- Two 1 1/4″ PVC 90 Degree Elbow Fittings
- 1 1/4″ PVC T Fittings
- 1 1/4″ PVC End Cap Fittings
- PVC Primer
- PVC Cement
- 2″ x 8″ Stock
- Stainless Steel U-Bolts: 5/16″ x 2″ x 3 11/16″
- 5/16″ x 1 1/2″ Stainless Steel Fender Washers (2 per U-Bolt)
- 3 1/2″ Galvanized Screws
Tools
- Power miter saw (or hand saw)
- Tape Measure
- Hammer
- Fine point permanent marker
- Safety Glasses
- Power drill
- 1/8″ Drill Bit
- 5/16″ Drill Bit
- 1 5/8″ Forstner Bit
- 1/2″ Wrench
The first step in building your own custom wader rack is to determine where you are going to mount it. This will define the overall length of your wader rack; and consequently, the number of fittings and length of PVC pipe. More specifically, each 90 degree elbow will occupy 3″ in length and each T fitting will occupy 4 1/4″ in length. My wader rack has an overall length of 3 feet. Hence, I used:
- 2 PVC 90 Degree Elbow Fittings
- 7 PVC T Fittings
- 9 PVC End Cap Fittings
- 10′ of PVC Pipe
The second step is to build the “backbone”: a series of inter-connected T fittings with an elbow fitting on each end. Cut 1 1/2″ lengths from the 1 1/4″ PVC pipe to join the fittings together. In my rack, I used 8 lengths. Prime both ends of each length. Using a flat surface, a piece of 2″ x 4″ stock, and a hammer, glue the fittings and lengths together to from the backbone. This will keep all the fittings aligned and pointing in the same direction.

The third step is to add the “hangers”: the PVC pipes that will hold the waders and boots. Cut 12″ lengths from the 1 1/4″ PVC pipe; one per fitting on the backbone. My rack has 7 T fittings and 2 elbow fittings. Hence, I cut 9 lengths. Prime both ends of each length. Glue an end cap fitting to one end of each length. Glue the hangers to the fittings on the backbone of the rack.

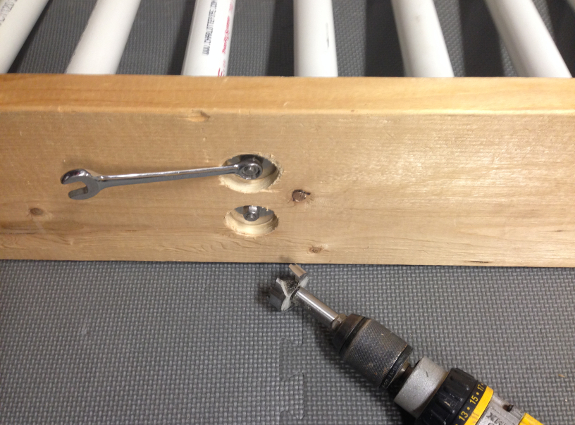
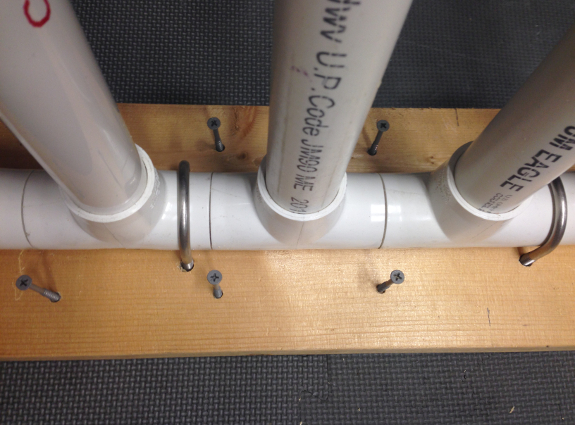
The forth step is to make a mount for the rack. Align the rack at mid-line on the 2″ x 8″ stock length. Drill 5/16″ holes above and below the backbone for the U-bolts. The U-bolts should be evenly distributed across the backbone. The number of U-Bolts depends on the length of your rack. My rack has 4 U-Bolts.

On the backside of the 2″ x 8″ stock, drill 1/2″ deep holes with a 1 5/8″ forstner bit to accommodate the washers and nuts of each U-bolt. Insert the U-bolts, washers, and partially tighten the nuts using a 1/2″ wrench. Adjust the rack so that it’s perpendicular to the mount and fully tighten the nuts.
The fifth step is to mount your rack. Pre-drill equally distributed 1/8″ holes above and below the backbone with a power drill. Using a 5/8″ bit, bore out these hole such that the head of the 3 1/2″ screws will be flush with the surface of wood. Partially drill in the 3 1/2″ screws into the pilot holes. And finally, mount your newly built wader rack to the wall by fully driving in the screws.
Commercially available wader racks are available for a nominal price. But, building a custom wader rack specifically for your needs is priceless. 😉