DIY Kayak Pole Anchor

Kayak pole anchors for shallow water anglers are available on the market.  They are not inexpensive and typically have a length of 8 feet. You can buy one or your build a custom shallow water kayak pole anchor between 6 and 10 feet.

Fish360 DIY Kayak Pole Anchor

Building your own custom pole anchor is easy. All you need is some inexpensive materials and basic tools. The build procedure only has four steps!

Materials

  • 3/4″ PVC Pipe (thin walls)
  • 3/4″ Copper Pipe
  • One 3/4″ PVC T Fitting
  • Two 3/4″ PVC End Cap Fittings
  • 3/8″ x 2 1/2″ Stainless Steel Hex Bolt
  • 3/8″ Stainless Steel Washer
  • 3/8″ Stainless Steel Nut
  • PVC Primer
  • PVC Cement

Tools

  • Power Miter Saw
  • Tape Measure
  • Fine Point Permanent Marker
  • Safety Glasses
  • Power Drill
  • 3/8″ Drill Bit
  • Adjustable Wrench
  • Copper Pipe Cutter

The first step is to build the shaft. Cut the 3/4″ copper pipe and 3/4″ PVC pipe to your desired length. Insert the copper pipe into the PVC pipe.

Fish360 DIY Kayak Pole Anchor

The second step is to build the handle. Cut two 1 1/2″ lengths from the left over length of 3/4″ PVC pipe. Prime and glue these two lengths to the ends of the T fitting. Glue the two end caps to the protruding ends of the two lengths.

Fish360 DIY Kayak Pole Anchor

The third step is to build the tip. Insert the stainless steel bolt into the tapered 3/4″ PVC fitting and secure it with a stainless steel washer and nut.  For a water tight seal, cover the head of the bolt inside the fitting with a generous amount of PVC cement.

Fish360 DIY Kayak Pole Anchor

The forth and final step is to join the shaft to the handle and tip. Prime both ends of the shaft. Glue the handle to one end.

Fish360 DIY Kayak Pole Anchor

Then glue the tip to the other end of the shaft.

Fish360 DIY Kayak Pole Anchor

The commercial pole anchors work. No question. But, I prefer my custom 10′ anchor, which allows me to fish up to 9 feet of water. Once anchored, I can paddle around the pole until my kayak is in the exact angle that I need to fish the respective structure. During my field test, I literally turned my kayak 180 degrees while anchored.  My DIY kayak pole anchor costs 75% less than a commercial pole anchor, but it’s value is priceless. 😉

Facebooktwitterlinkedin

DIY Wader Rack

As I add more species and methods to my target list, my wader and water footwear collection grows. I searched for a commercial wader rack, but I could not find one that would maximize the available wall section in my garage. So, I built a wader rack to store my waders and boots.

Fish360 DIY Wader Rack

Building your own wader rack is not difficult. You do not need a contractor’s licence! In fact, you just need some inexpensive materials and basic tools.

Materials

  • 1 1/4″ PVC Pipe
  • Two 1 1/4″ PVC 90 Degree Elbow Fittings
  • 1 1/4″ PVC T Fittings
  • 1 1/4″ PVC End Cap Fittings
  • PVC Primer
  • PVC Cement
  • 2″ x 8″ Stock
  • Stainless Steel U-Bolts: 5/16″ x 2″ x 3 11/16″
  • 5/16″ x 1 1/2″ Stainless Steel Fender Washers (2 per U-Bolt)
  • 3 1/2″ Galvanized Screws

Tools

  • Power miter saw (or hand saw)
  • Tape Measure
  • Hammer
  • Fine point permanent marker
  • Safety Glasses
  • Power drill
  • 1/8″ Drill Bit
  • 5/16″ Drill Bit
  • 1 5/8″ Forstner Bit
  • 1/2″ Wrench

The first step in building your own custom wader rack is to determine where you are going to mount it. This will define the overall length of your wader rack; and consequently, the number of fittings and length of PVC pipe. More specifically, each 90 degree elbow will occupy 3″ in length and each T fitting will occupy 4 1/4″ in length. My wader rack has an overall length of 3 feet. Hence, I used:

  • 2 PVC 90 Degree Elbow Fittings
  • 7 PVC T Fittings
  • 9 PVC End Cap Fittings
  • 10′ of PVC Pipe

The second step is to build the “backbone”: a series of inter-connected T fittings with an elbow fitting on each end. Cut 1 1/2″ lengths from the 1 1/4″ PVC pipe to join the fittings together. In my rack, I used 8 lengths. Prime both ends of each length. Using a flat surface, a piece of 2″ x 4″ stock, and a hammer, glue the fittings and lengths together to from the backbone. This will keep all the fittings aligned and pointing in the same direction.

Fish360 DIY Wader Rack

The third step is to add the “hangers”: the PVC pipes that will hold the waders and boots. Cut 12″ lengths from the 1 1/4″ PVC pipe; one per fitting on the backbone. My rack has 7 T fittings and 2 elbow fittings. Hence, I cut 9 lengths. Prime both ends of each length. Glue an end cap fitting to one end of each length. Glue the hangers to the fittings on the backbone of the rack.

Fish360 DIY Wader Rack

The forth step is to make a mount for the rack. Align the rack at mid-line on the 2″ x 8″ stock length. Drill 5/16″ holes above and below the backbone for the U-bolts. The U-bolts should be evenly distributed across the backbone. The number of U-Bolts depends on the length of your rack. My rack has 4 U-Bolts.

Fish360 DIY Wader Rack

On the backside of the 2″ x 8″ stock, drill 1/2″ deep holes with a 1 5/8″ forstner bit to accommodate the washers and nuts of each U-bolt. Insert the U-bolts, washers, and partially tighten the nuts using a 1/2″ wrench. Adjust the rack so that it’s perpendicular to the mount and fully tighten the nuts.

Fish360 DIY Wader Rack

The fifth step is to mount your rack. Pre-drill equally distributed 1/8″ holes above and below the backbone with a power drill. Using a 5/8″ bit, bore out these hole such that the head of the 3 1/2″ screws will be flush with the surface of wood. Partially drill in the 3 1/2″ screws into the pilot holes. And finally, mount your newly built wader rack to the wall by fully driving in the screws.

Fish360 DIY Wader Rack

Commercially available wader racks are available for a nominal price. But, building a custom wader rack specifically for your needs is priceless. 😉

Facebooktwitterlinkedin

DIY Spool Jig

The most efficient and economical way to spool your reels is by using a 1,500 yard spool. These large spools are challenging to handle. But, with some simple tools and inexpensive materials, you can build a spool jig.

Fish360 DIY Spool Jig

Materials

  • 5/8″ Diameter Wooden Rod
  • 2 1 1/2″ Finish Nails
  • 6 2 1/2″ Screws
  • 1″ PVC Pipe (with a 5/8″ Inner Diameter)
  • 2′ 2″ x 8″ Stock
  • 2 5/8″ Rubber Hose Washers

Tools

  • Power Drill
  • 1/8″ Drill Bit
  • 5/8″ Spade Bit
  • Mitre Saw
  • Hammer

Cut a 7″ length from the 2″ x 8″ stock. This will be the base. Cut two 6″ lengths from 2″ x 8″ stock. These will be the sides. Measure and mark the center lines on one end of each side. Measure 1/2″ down from the top of each side’s center line and make a perpendicular mark. Drill a 5/8″ hole at each of these two cross marks. These holes will be for the 5/8″ wooden rod that the spool will rotate on.

Fish360 DIY Spool Jig Step 1

Standup the two sides against the base. Pass the 5/8″ wooden rod through the two holes until the end of the rod is flush with the far side. Mark and cut the rod to length.

Fish360 DIY Spool Jig Step 2

Center the spool onto the rod. Insert a 5/8″ rubber hose washer onto each end of rod until they are flush with the spool. Measure and cut two lengths from the 1″ PVC pipe such that they push against the rubber hose washers and the inner sides of the jig. To calculate this length, add the width of the spool and the thickness of the two rubber hose washers. Subtract this total length from the length between both sides and divide the result by two. Insert the two PVC lengths onto each end of the rod. These PVC segments will keep pressure on the washers as the spool rotates.

Fish360 DIY Spool Jig Step 3

Insert each side onto each end of the rod. Drill a 1/16″ hold through the center of the rod from the top of each side. Drive a 1 1/2″ finish nail though each hole. This will secure the rod to the sides and keep it from rotating.

Fish360 DIY Spool Jig Step 4

Secure the bottom to the sides using 2″ screws. Be sure to pre-drill using a 1/8″ drill bit.

Fish360 DIY Spool Jig Step 5

There are commercial line winders available. But, given the high performance of my low cost DIY spool jigs, I am not in a hurry to buy one. 😉

Facebooktwitterlinkedin

DIY SOT Kayak Cart

Transporting a kayak from your vehicle to the water’s edge can be aggressively done by grabbing the handles at mid-boat and heaving the kayak up and over your head. But, then you have to come back for your gear. If parking for the access site is 1/4 mile away, then multiple trips back and forth is lost time fishing. With some inexpensive materials and basic tools you can easily build a proper kayak cart to transport your SOT kayak and gear safely and efficiently all at the same time.

Fish360 DIY SOT Kayak Cart

MATERIALS

  • 6 feet of of 3/4″ SCH 40 PVC Pipe
  • 4 3/4″ PVC T fittings
  • 2 wheels (e.g. 3.00 x 4 Wheel)
  • 1 24″ long x 1/2″ Diameter Aluminum Rod
  • 4 1/2″ x 2″ Stainless Steel Washers
  • 2 1/8″ x 1 1/4″ Cotter Pins
  • 8 oz of PVC Primer
  • 8 oz of PVC Cement

TOOLS

  • Power miter saw
  • Power Drill
  • 1/8″ Drill Bit
  • Channel Lock Plyers
  • Hack Saw
  • Tape Measure
  • Fine point permanent marker
  • Safety Glasses

Before you start cutting PVC, the fist thing to do is get your axle ready. Solid 1/2″ diameter aluminum rods are available at Home Depot and Lowes in 3 foot lengths. Using a hack saw, cut the 1/2″ diameter aluminum rod to 24″ inches. Measure 3/8″ from each end and drill a 1/8″ hole using a power drill.

Fish360 DIY SOT Kayak Cart

These holes will be for the cotter pins that will keep the wheels from rotating off the axle.

Fish360 DIY SOT Kayak Cart

The first measurement to determine is the length of the segments that will go through the scupper holes (i.e. “A”). Flip you kayak over so that the bottom is facing up. Place a segment of PVC across the hull just below the scupper holes that the cart will use. Measure the length from the top of the scupper hole to the top of the PVC pipe traversing the kayak. Add 3″ to this measurement. Cut two PVC segments at this length.

Fish360 DIY SOT Kayak Cart

The second measurement to determine is the length of the PVC cross members (i.e. “B”). Insert the two “A” segments into the tops of two T fittings. Insert these units into the scupper holes so that he middle holes of the T fittings are facing each other. Measure the distance between the two T fittings. Add 1 1/2″ to this measurement (3/4″ for each fitting). Cut two segments at this length.

Fish360 DIY SOT Kayak Cart

Insert one “B” segment into the center holes of the two T fittings with the “A” segments. This is the upper part of the cart.

Fish360 DIY SOT Kayak Cart

Insert one “B” segment into the ends of the other two T fittings. This is the lower part of the cart.

Fish360 DIY SOT Kayak Cart

The third measurement to determine is the length between the two segments that will join the upper and lower parts of the cart (i.e. “C”). Insert the upper unit into the two scupper holes. Insert the aluminum axle through the lower part of the cart and temporarily mount the wheels. Place this assembled lower unit above the scupper hole using 3″ spacers underneath each wheel. Measure the distance between the two T fittings. Add 1 1/2″ to this measurement (3/4″ for each fitting). Cut two segments at this length.

Fish360 DIY SOT Kayak Cart

Connect the the upper and lower parts of the cart via “C” segments. Insert the cart into the scupper holes.

The fourth measurement to determine is the length of the segment that will keep the wheels at the expected distance (i.e. “D”). The simplest way to calculate this measurement is to push the axle to one side. Measure the length of exposed axle. Divide this length by two and add 3/4″ to account for each respective T fitting. Cut two segments at this length.

Fish360 DIY SOT Kayak Cart

Remove the wheels and the axle. Insert the two “D” segments into the ends of the T fittings. Re-insert the axle and re-mount the wheels temporarily. Insert the cart into the scupper holes.

Triple check the assembled cart and make adjustments as needed. Break down the cart. Prime and glue all the connections.

Fish360 DIY SOT Kayak Cart

There are some some generic SOT kayak carts on the market. I am sure they work fine. But, I personally prefer to build a custom SOT kayak cart for 1/3 of the cost. Did I mention I have a fleet of kayaks? 😉

Facebooktwitterlinkedin

DIY Lanyards

Lanyards are standard equipment for extreme surfcasters and kayak anglers. Finding a quality lanyard at a price that will not break the bank, can be more challenging than catching fish! 🙁 But! With some simple tools and a recycled mobile phone car charger, you can create your own lanyard. 🙂

DIY Lanyard Materials

Making a lanyard is easy! First, cut off the ends off the mobile phone car charger. Second, insert one end of the cord through the first hole in an aluminum ferrule. Third, form a small loop by inserting the end of the cord back through the second hole in the aluminum ferrule. Fourth, using a pair of pliers, crimp both sides of the aluminum ferrule. Repeat steps 2 – 4 for the other end.

DIY Lanyard

I build my lanyards for specific applications. The first lanyard that I build has two small loops at each end; I use zip ties to anchor each end. The second lanyard that I build has a small loop at one end and a clip with an eyelet at the other end; this makes anchoring my gear to my AquaSkinz belt or kayak a snap! The third lanyard that I make has clips at each end; this is a heavy duty lanyard.

The first advantage to building your own lanyards is costing savings. The second advantage is customizing your lanyards to your specific application, which is priceless.

Facebooktwitterlinkedin

Eel Jar

Eels are to striped bass as salt is to sea water. Seasoned Surfcasters have been exploiting eels to seduce trophy striped bass for many a tide. The two most widely used methods to transport eels whilst fishing the surf is mess bags and soft coolers. The Eel Jar is a new method that is starting to become widely adopted in the surfcasting community.

Eel_Jar_575_450

Making your very own eel jar is easy. First, get a large plastic container with a screw on top. For example, a recycled 64 oz jar of Helman’s Mayonaise works really well. Second, secure a lanyard to the container’s screw on lip. Third, secure two stainless steel D-rings and the other end of the lanyard to the neck of the container via zip-tie. Forth, snap on a shoulder strap to the two D-rings. I prefer to clip my eel jar to my AquaSkinz belt using a single D-Ring and clip.

The eel jar transports eels as effectively as mesh bags, without the complimentary eel slime streak running the side of your leg. The Eel Jar can also transport eels as effectively as soft coolers, without breaking the bank. Now that’s fishconomic!

Facebooktwitterlinkedin

DIY Canoe Rack

I purchased a Mad River canoe.  The canoe is fantastic!  But, transporting a 16 foot canoe can be a challenge.  So, I built a custom canoe rack.

Canoe_Rack

You can build this custom canoe rack with some inexpensive materials and basic tools.

Materials

  • 2    2″x4″x10′ pressure treated stock
  • 1    1″ 36″ stock iron pipe
  • 2    1″ iron pipe end caps
  • 4    2.5″ U-Bolts
  • 2    1.75″ U-Bolts
  • 10  3 1/4″ Eye Bolts
  • 10  1/4″ Flat Washers
  • 1    30″ 1.5″ PVC stock
  • 50′ 3/8″ Braid Poly Rope

Tools

  • Power Drill
  • Drill bits
  • Adjustable Wrench
  • 2 Pipe Wrenches

Procedure

1. Drill holes into the pressure treated stock for the eye bolts such that they are equally distributed throughout the length of the pressure treated stock.

2. Secure the 3 1/4″ eye bolts to the pressure treated stock with the 1/4″ flat washers.

3. Place the pressure treated stock on your roof rack.  Mark the placement of the 2.5″ U-blots such that they secure the stock to your roof rack.  Remove the stock from your roof rack and drill the holes for the four 2.5″ U-bolts.

4. Loosely secure the 2.5″ U-bolts to the pressure treated stock.

5. Mark and drill the holes for the 1.75″ U-bolts on the rear ends of the pressure treated stock.  (These will be used to secure the stock 36″ iron pipe.)

6. Loosely secure the 1.75″ U-bolts to the rear ends of the pressure treated stock.

7. Using two pipe wrenches, secure one of the iron end caps to the iron pipe.  Insert the un-capped end of the iron pipe onto the PVC pipe.  Secure the other iron end cap to the iron pipe using two pipe wrenches.

8. Secure the pressure treated stock to your your roof rack using the 2.5″ U-bolts.

9. Secure the iron pipe using the 1.75″ U-bolts.

10. Roll your canoe onto your custom canoe rack.

11. Secure your canoe to the rack using the 3/8″ rope.

This simple and inexpensive custom canoe rack has several advantages. First, taking the canoe on and off the rack with the “roller” is easy.  Second, (depending on your vehicle) you may still have access to your rear cargo area because you do not need to tie the rear end of the canoe to your rear bumper.  Thirdly, and most importantly, it holds the canoe securely.

Facebooktwitterlinkedin

Plug Management: Wall it!

As surfcasters we must be prepared for various water depths, changing current velocities, wind, and fish with unpredictable appetites.  As a result, the number of plugs in our arsenal explode to military proportions.  Hence, the birth of plug management solutions.

Two widely used plug management solutions are milk crates with tubes and large Plano boxes.  These two solutions can store and organize countless plugs.  But, I have been searching for a day-to-day solution that allows me to quickly see and select my plugs for my next fishing trip and to dry my plugs after their fresh water bath removes the corrective sea salt.

This past June I was at the Cuttyhunk Fishing Club with some members from S-B.com talking through the daylight hours and the topic of “plug management” came up.  My friend Bruce May, who builds fine custom furniture at  B & M WoodWorking, suggested setting up wire lines on a wall  to  hang plugs— like wet clothes on a clothes line.  Building on Bruce’s idea, I installed a peg board on the wall of my garage and created “plug lines” using peg hooks and wire:

Fish360 Plug Management

Setting up a Plug Wall is inexpensive and easy.  All you need is:

  1. A 4′ x 8 ‘ sheet of peg board
  2. A box of 1 5/8” galvanized course screws
  3. 24 double-prong peg hooks
  4. Wire (e.g. 12 gauge insulated electrical copper wire)
  5. A power drill
  6. A pair of wire cutters/pliers (e.g. Lineman Pliers)

When you insert the peg hooks side-ways, be sure to insert them in such a way that when the wire “pulls” on them, they “push” back:

Fish360 Plug Management

Also, be sure to insert a peg hook mid-line to keep the plug-line straight while under load:

Fish360 Plug Management

In addition to storing plugs, the Plug Wall can also store jigs, tins, and rigged soft plastics.  My Plug Wall allows me to spend more time fishing and less time “managing” my day-to-day plugs.  Thank you for the insight Bruce!

Facebooktwitterlinkedin

The Fisherman’s Bucket

There are a plethora of tackle and bait storage solutions on the market today. No question. But, when it comes to a low cost, light, non-corroding, water resistant, low maintenance, and multi-functional solution, The Fisherman’s Bucket surpasses the competition:

Fish360 Fisherman's Bucket

The low cost, non-corroding, water resistant, and low maintenance features are self-evident. But, how can a simple “bucket” become so versatile and serve multiple functions for a fisherman? The universal use of The Fisherman’s Bucket is to store fish. I became convinced of this when a Japanese man (who did not know a single word of English!) approached me, smiled, bent over, and removed the lid from my bucket. His face turned from excitement to disappointment when his eyes processed the fact that cavernous volume of my bucket was filled with tackle and not fish. Besides fish and tackle storage, The Fisherman’s Bucket serves as a seat, and can be easily rigged for other purposes (e.g. live well or eel bucket).

Some manufactures have realized the versatility of the “bucket” and have produced commercial products. The ones that I have seen have the following features for a price of $19.99:

  1. Thin side walls
  2. Flexible lid
  3. 5 Gallons of storage

Such products will not last the demads of surf fishing. First, surf fisherman also need a sturdy seating platform that is not going to collapse under his or her weight or flip over in the trunks of our vehicles.  Second, surf fisherman need more than 5 gallons of storage volume: we catch big fish and carry a good amount of tackle.

With some basic materials and a few tools, you can create your very own Fisherman’s bucket at a fraction of the cost

Materials

  1. 3/8″ Poplyproplylene rope (e.g. camping rope or marine rope)
  2. < 5/32″ rope or twine
  3. 5 Gallon Bucket
  4. 6 Gallon Bucket
  5. Bucket Lid
  6. Duct tape
  7. Foam (e.g. recycled styrofoam trays)

Tools

  1. Jigsaw
  2. Drill
  3. 1/2″ Drill bit
  4. 5/32″ Drill bit
  5. Utility Knife

Procedure

Remove the metal wire handles from both buckets.  Measure 4.5 inches from the bottom of the 5 gallon bucket and mark the bucket with a black permanent Fisherman’s Bucket marker. Repeat until you go “full circle”.  Using role of tape, just cover the black line with the outside edge of the tape.

Fish360 Fisherman's Bucket

Using a 1/2″ drill bit, make a pilot hole just below the duct tape edge and insert the Jigsaw blade into the hole.  Using the edge of the duct tape as a guide, cut off the bottom portion of the 5 gallon bucket. Insert the newly created “bucket extender” into the 6 gallon bucket and align the holes left by the wire hangers. Using a 1/2″ drill bit, enlarge the fist hole; be sure to penetrate the side wall of the “bucket extender”. Repeat for the other side. Remove the bucket extender from the bucket. Using duct tape, secure strips of 1/4 inch thick styrofoam to the side wall of the bucket extender.  This will created a tighter “seal” and reduce “wobbling”.

Fish360 Fisherman's Bucket

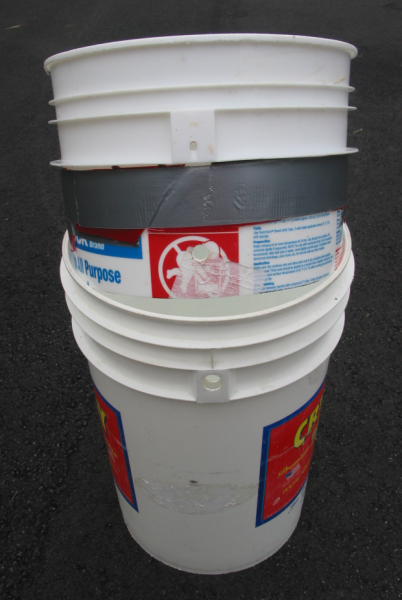
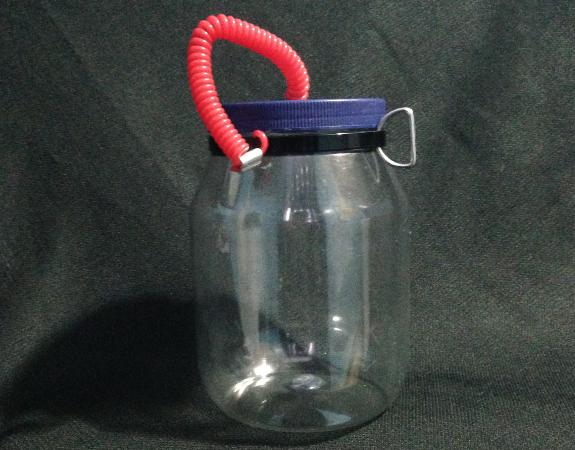
Insert the bucket extender into the bucket. Align the previously enlarged holes. Insert one end of the 3/8″ rope through the hole and tie a knot on the inside. Run the rope over the top of the bucket an insert the other end of the rope through the other hole and tie a knot.

5/32″ drill bit, make a hole in the back of the lid. Run the twine through the hole and tie a knot. Secure the other end of the twine to 3/8″ rope. This will prevent wind or water from taking the lid to Posidan’s front door. Trust me!

Options

Based on the purpose of the your bucket, there are several varions.

  1. If you do not have a 6 gallon bucket, then two five gallon buckets will work fine.  This will just give a shorter seating height, which may be desired based on your height.
  2. The less labor intensive option would be to purchase a 7 gallon bucket and simply replace the wire hanlde with the rope handel and attach the lid.  In fact, the 7 gallon bucket has the same height as the 6 gallon/5 gallon bucket combination.
  3. If you application is going to be eel transport or storage, I would recommend a black bucket, given that eels take on the color of their surroundings; unless you are looking to produce albino eels.
Facebooktwitterlinkedin