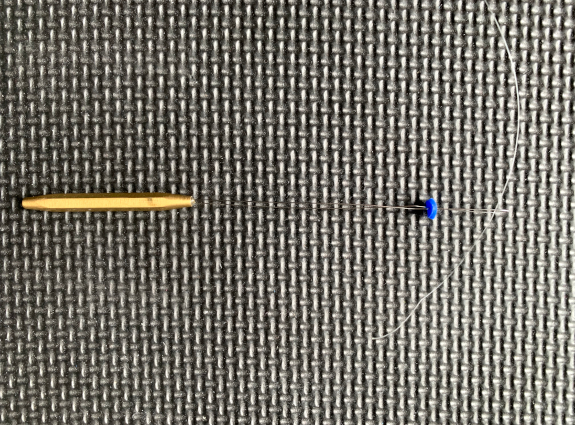
A bobber stop is a brilliant device that allows anglers to quickly set and reset the depth of their presentation when fishing a sliding bobber. With a few simple tools and inexpensive materials, you can make your own bobber stop.
First, cut a bobber stop disc out of a soft rubber material via single hole paper punch. For example, I used the soft rubber sleeve from a spent pen.
Second, make a hole in the center of the bobber stop disc. For example, I used the end of a straightened out paper clip.
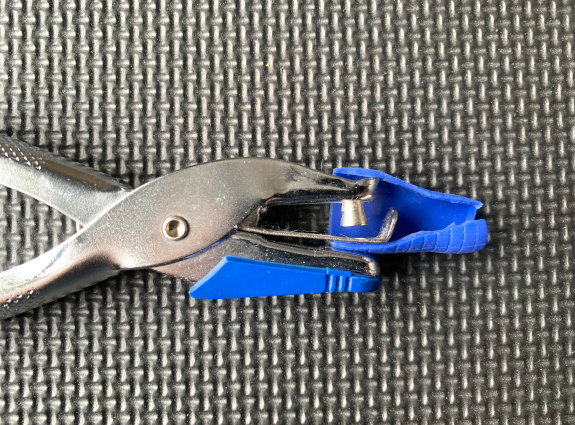
Third, pass the wire though the hole in the bobber stop disc. For example, I used a fly tying bobbin threader
Commercial bobber stops are readily available at reasonable prices. I prefer to make my own at $0.00. 🙂
I ice fishing with tip-ups because they are the most efficient way to cover lots of water simultaneously. The acceleration of adrenaline when a flag is sprung and racing for the sky makes me sprint across the ice without fear of falling. My only complaint about tip-ups is storage. After experimenting with several tip-up storages solutions, I have built a custom Tip-Up Rack for my ice fishing sled.
The journey from concept to completion had several prototypes and adjustments. The final design is surprisingly simple. There are no moving parts and minimal space is taken up inside my ice fishing sled. During my first ice fishing trip, the 100% water proof rack performed perfectly!
The only disadvantage of this for-life rack is the build process. The multi-step build procedure requires several specialized power tools and knowledge of working with epoxy, fiberglass cloth, and epoxy fillets. An alternative build procedure is to use 1/4″ PVC sheets and 1″ thick PVC boards. This alternative is more expensive that the cut-off wood stock that I used and it will produce a heavier rack.
My first DIY Wacky O-Ring uses heat shrink tubing. This solution works well. However, if heat is applied too long, it can melt the Senko, which is no bueno. I now use recycled rubber grips from spent pens.
Making Wacky O-Rings from recycled rubber pen grips has one step: cut a 1/4″ wide ring from the end of the soft rubber grip via utility knife. I use my DIY Wacky O-Ring Rigger to secure the DIY Wacky O-Rings to my Senkos.
This second generation DIY Wacky O-Ring has several advantages. First, it costs $0.00. Second, it is very easy to make. Third, it does not damage the Senko, which can happen when applying heat during to shrink the tubing on generation one. Forth, it provides a stronger grip on the Senko than commercial O-Rings because it has a wider surface area. And lastly, it allows the hook to be perpendicular to the Senko, which increases your hook-up ratio.
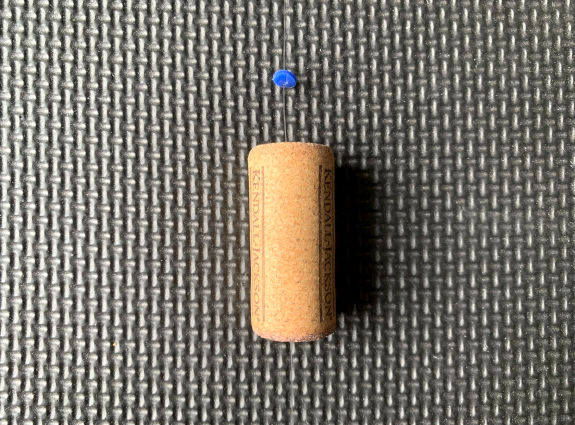
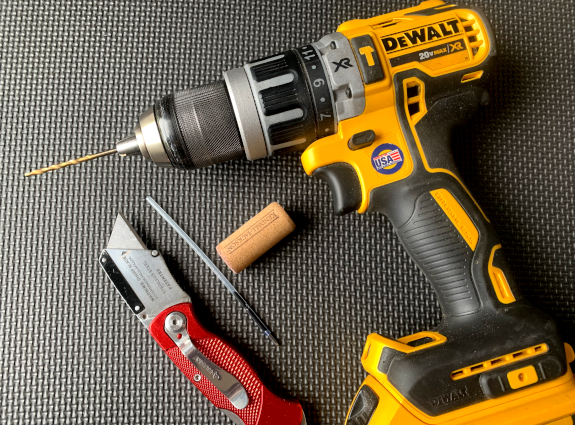
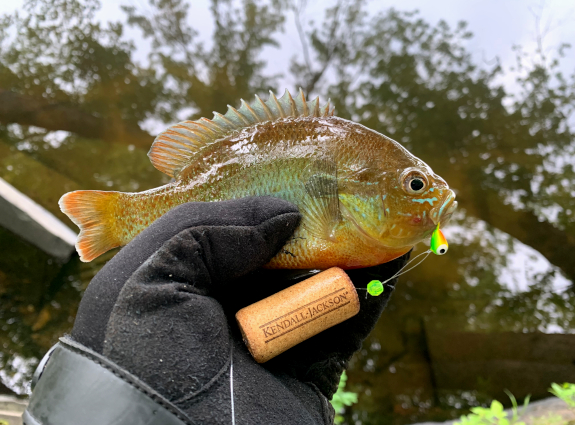
Several years ago I made a DIY Bobber from a wine bottle cork. This durable and low cost DIY Bobber casts better than a traditional spherical bobber and it catches fish! I was recently fishing a spot where the fish were beyond my cast. With some simple tools and a plastic tube, I created a DIY Sliding Bobber.
Making your own sliding bobber is easy. First, drill a hole through the center of a wine bottle cork with a power drill and a drill bit with the diameter of the plastic tube that you are going to use. Second, cut and insert the plastic tube. (I used the empty ink tube from a ball point pen.) Add lastly, add a bobber stop to you line, insert the line into the bobber, add a plastic bead or a another boober stop, and tie your jig or hook.
A sliding bobber will out cast a fixed bobber because all the weight is at the end of the line, which has better aerodynamics. When the bobber hits the water, the jig sinks— which pulls the line through the bobber until the bobber stop.
The DIY Sliding Bobber is now my go-to rig for bobbing because its low cost, durable, long casting, and incredibly effective at catching fish. Thankfully, I have a life-time supply of wine bottle corks that I inherited from my late F.I.L..
When I am Freshwater Surfcasting, I keep my gear and rigging minimal and simple. I pre-tie all my leaders and rigs for quick exchanges. While fishing, I store my leaders and rigs in my leader wallet on neck lanyard.
Making your own leader wallet with a neck lanyard is easy. You only need a recycled bobble wrap shipping bag, a pair of scissors, a Sharpie, two grommets, and a neck lanyard.
First cut a two inch deep strip from the bobble wrap shipping bag. Second, mark the placement of the grommets via Sharpie and cut out the holes to accommodate your grommets. Third, mount your grommets with the crushed end facing the opening of the leader wallet so that they do not grab your clothing. And finally, mount your neck lanyard.
I have field tested this low cost leader and rig storage solution while targeting American Shad. I found it effective and efficient. Time is fish!
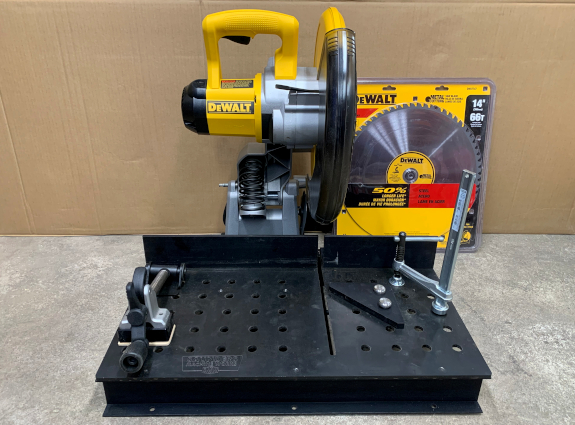
During 2020, I spent a good amount of time (during the hours that I should have been sleeping) designing new DIY projects. In order to complete these complex projects, I need new tools. My first investment was in a DEWALT Metal Cutting Saw (DW872) with an after-market base. Some of my metal projects require stainless steel bolts; but, some projects require the liquefaction of metal via electricity to form joints. Hence, my second investment was a welder and welding equipment.
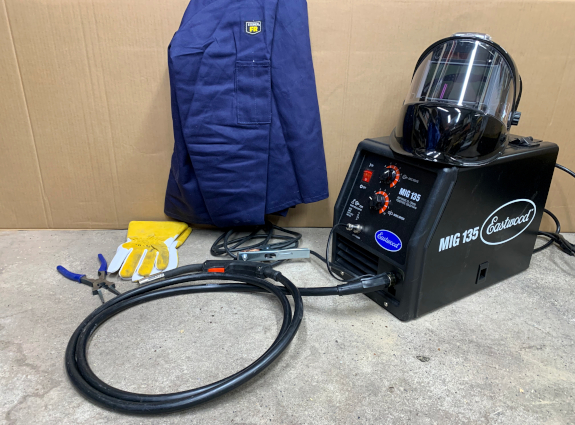
After reviewing and comparing several welders, I selected the Eastwood MIG 135 because it can weld up to 1/4″ thick steel via flux core on standard 110V electricity. The welder also comes with a gas regulator to weld up to 3/16″ thick steel via solid MIG wire on standard 110V electricity. Unlike other welders in this category and price range, the Eastwood MIG 135 can also weld aluminum via spool gun.
The most essential equipment for welding is safety gear. I chose the Eastwood Panoramic View True Color welding helmet. The auto-darkening, the large 180 degree view, and the viewing clarity is amazing! You have to be able to see your liquified puddle of metal to make a proper weld. I also got a pair of welding gloves, a pair of MIG Welding Pliers, and a flame resistant and anti-static welding jacket.
The Eastwood MIG 135 comes with a MIG wire tip and Flux Core wire tip. These are great to get started; but, it’s best to have replacements available before you need them. Hence, I ordered a consumables kit.
The Eastwood MIG 135 also comes with a spool of solid MIG wire. I am planning to weld via flux core, hence I ordered flux core wire and a can of anti-spatter spray to make the post-weld clean up easy.
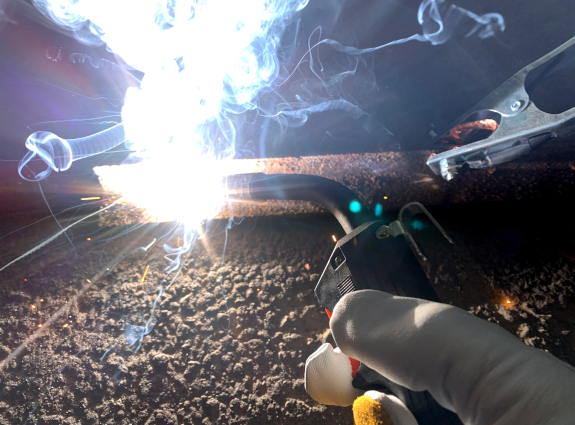
I have tested my new welding equipment on scrap iron to become comfortable and confident in my equipment and with welding. The equipment has exceeded my expectations. In fact, the Eastwood MIG 135 makes welding easy! Check out Eastwood’s great videos on welding and how to setup the Eastwood MIG 135.
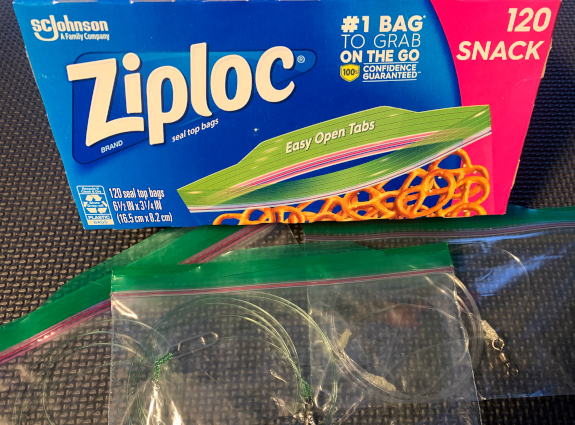
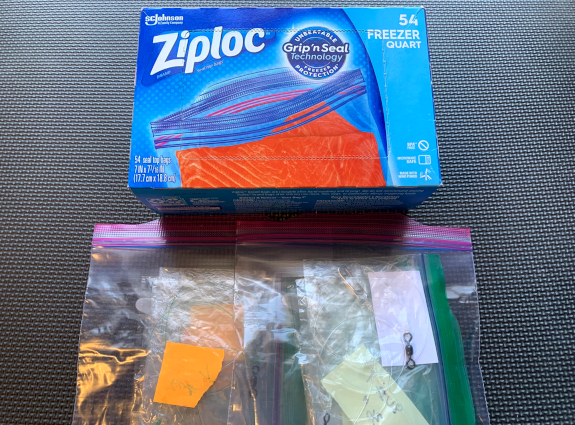
As an all species, all methods angler, I have a lot of leaders. I have used several different leader wallets. They work well in my garage. But! When I fishing, they get dirty quick. Cleaning them takes more time than making new leaders. I hence now use a simple storage solution that works well off, on, and in the water.
I tie all my leaders when I am on terra firma between my trips. I store each leader in a ZipLock Snack bag. For Saltwater fishing, for example, I use 40 lb, 60 lb, and 80 lb monofilmaent line for my leaders. I make them in pink, green, and clear, respectively. This allows me to quickly know the strength of the line.
This simple storage solution has a small footprint and provides optimal organization. But! Most importantly, this simple storage solution $aves me money and time. Time is fish!
During 2020, I spent a good amount of time (during the hours that I should have been sleeping) designing new DIY projects. In order to complete these complex projects, I needed to invest in a metal cutting saw. After much research, I decided to go with the the DEWALT Metal Cutting Saw (DW872). Even though the saw comes with a 14″ metal cutting blade, I purchased a back up blade (DWA7747) so that I can continue my project without interruption, if the blade burns out.
The stock base of the DEWALT Metal Cutting Saw (DW872) is solid. However, since I will be working with long metal stock that I need to cut at 90 and 45 degree angles accurately and safely, I purchased an after-market saw base from John Saunders Machine Works. I have already put this set up use on a DIY project. OMG! The base, the 45 Degree Jig, the Clamp Adapter for DeWalt Fixture Plate, and the Sliding Arm Clamp are all worth their weight in salt!!!
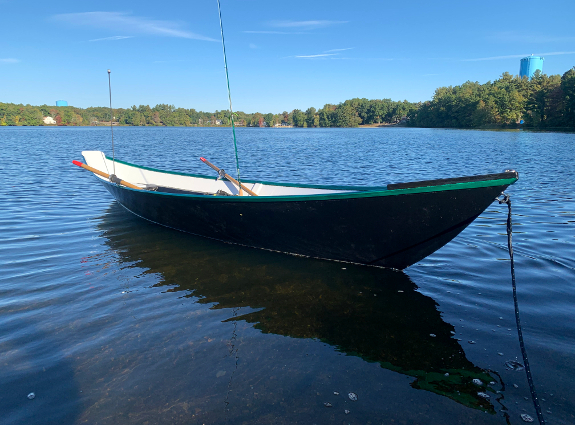
I first learned of the Gloucester Light Dory in an issue of On The Water. The simple design and fishability of the boat captured my attention. I was born on a small island in the mid-Atlantic. My family fished and built boats. The OTW article inspired me to build a Gloucester Light Dory and reconnect with my heritage. My goal was to simplify the build process and increase the fishability to the extreme.
The most important feature of my custom Gloucester Light Dory is invisible. The boat is built via stitch and glue. For stitches I used staples driven via DeWalt pneumatic power tools, which are are significantly stronger than twisted copper wire stitches. In addition to the staples, each joint is triply re-enforced via epoxy fillet, fiberglass tape, and fiberglass cloth. The marine plywood is 100% enclosed (inside and out) via multi-layers of fiberglass cloth and West System epoxy. There is no possibility for rot on this boat!
Each feature on my boat has its own story. But, that’s a story for another time. ;-). In short, here are the visible features:
Color via epoxy pigments (no paint to scratch or flake)
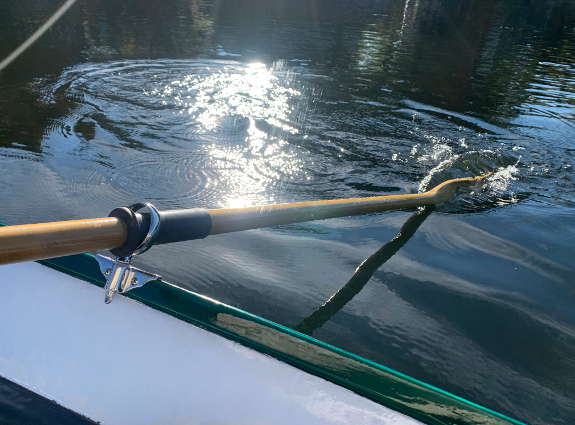
After countless hours and sheets of sandpaper, I finally launched my custom Gloucester Light Dory. The boat performed beyond my expectations. The boat is surprisingly stable. I was able to stand up and cast, which I cannot do on my kayak. A pair of 7 foot oars provide maximum propulsion with minimal effort. The oars, unlike a kayak paddle, give me infinite control to move the boat forward, backwards, and sideways. When fishing, I rest the oar blades on the rear seat. On this first trip, I landed the meanest, bad-ass, bluegill terrorizing bass in my town’s lake.
Building a custom Gloucester Light Dory tested my high school knowledge of Geometry, required two cups of patience for each cup of coffee, and pushed my problem solving skills to the edge of my imagination. I am proud to say that owning a one-of-a-kind, low-maintenance, high-performance fishing machine at a fraction of the cost of a commercially built boat is priceless. 🙂
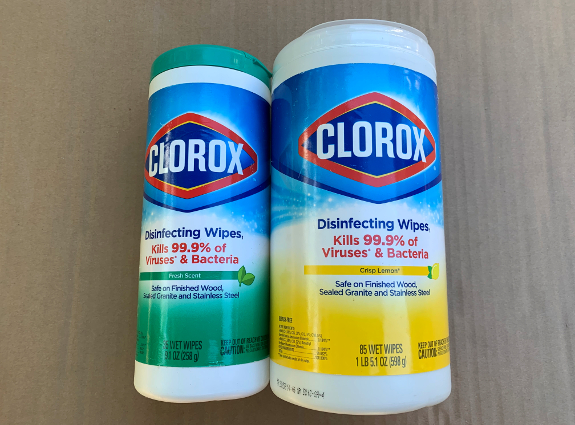
I use my DIY Plug Crate storage solution to manage my plugs. The COVID19 global pandemic has inspired me to simplify this storage solution. Instead of buying and cutting PVC rain gutter drain tubes, another option is to use empty Clorox wipes containers.
Making this COVID19 inspired DIY Plug Create is easy! First, remove the tops from the Clorox wipes containers. Second, drill or puncture some drainage holes on the bottoms of the Clorox wipes containers. And lastly, insert the Clorox wipes containers into the milk create.
The first advantage of this Plug Crate is the cost: the empty Clorox containers are $0.00 and no plexi-glass for the bottom is required. The second advantage is the simplicity of the build: no cutting required. The single disadvantage is that the Clorox containers do not fully optimize the interior volume of the milk crate.